Tuesday, July 12, 2011

Drink of The Gods!

Mead. Zeus drank it. Hoards of rampaging Vikings drank it. Now you, too, can revel in the glory of mead. Mead is honey wine, the first known fermented beverage. Ever. It has historically been a very common way to booze it up - and by common, I mean pretty much every culture has made and enjoyed some type of mead. Sadly, with the industrialization of alcohol production, it's pretty hard to find commercially made mead. Lucky for you, you can make your own at home. I recommend you try making cider or wine with fruit before you make mead, because it can be a tricky one.

This recipe is for cyser, or apple mead. I like apples in my booze. You could use a different kind of juice to suit your taste. 

What You Need:
All the equipment listed in my basic cider post.
An additional fermentation vessel. I use the glass jugs that the juice comes in with
An additional air lock and stopper. 
Honey, 10 cups
Apple juice (with no preservatives), 2.5 gallons
Water, 5 quarts
Black tea, 5 cups
1 package of champagne yeast
5 teaspoons acid blend (available at your FLHBS)
5 teaspoons yeast nutrient (also available at your FLHBS)

Heat the water and stir in the honey,  along with the acid blend, yeast nutrient, and tea. I forgot the tea until the last minute and added it afterward, and it turned out ok - so there is room for error here. Stir the honey until it's dissolved, and simmer for five minutes. Turn the heat off and let it cool down to body temperature, then add the honey mixture to the juice and yeast in the primary fermentation vessel. Snap on the lid and airlock and let the yeast do the work.

After two or three weeks, transfer the mead to the secondary carboy. After that, it's a matter of months, really. I left my mead in secondary for about three months.

Clearing ... clearing ... clearing ...


Wait until there are no bubbles coming out of the airlock for at least five minutes at a time before bottling. Wait to drink until six months - at least! - after bottling. Mead really improves with age, so have patience. I want to know what my first mead will taste like in ten years! Of course I had a taste during bottling (that's just standard operating procedure), and I will admit it tasted plenty drinkable to me already. I'm trying not to think about it.

Nothing says "home" like a cupboard full of mead.

For a much more thorough explanation of the mead making process, the history of mead, and the effects of different types of honey on mead, visit Mead Made Complicated. Wiki also has a fairly decent page on mead.

If you are lucky enough to live near Boulder, Colorado, please do pay Redstone Meadery a visit. They are an amazing local meadery and I love them so much I want to marry them. Don't tell my spouse.

Friday, July 8, 2011

Variations on a Blueb

Summer is here, and that means canning season is in full swing. This time last summer I acquired my water bath canner and moved to Seattle. I was inspired to preserve food by my six month long journey around the country, staying at intentional communities and helping them grow their gardens and preserve what they produced. I learned how to can by making blackberry jam from foraging the blackberries that grow wild all over the city. The first jam session took me all day, but it was delicious, and it was mostly free, and I was hooked.

Sadly, there are no blackberries free for the foraging in Colorado, but blueberries are currently abundant and since they were on sale at my local market, I decided some blueberry preservation was in order. In the middle of the long Colorado winter, when snow covers the garden and my windows are frosted over, I will crack open a jar of homemade blueberry syrup and stave off the oppressive cold with a stack of blueberry pancakes and a hot cup of tea. It sounds so good, I almost can't wait until winter. Hah! Just kidding.

Blueb Syrup 
7 cups blueberries
1 cup sugar, I used organic evaporated cane juice.
2 tablespoons lemon juice
2 cups blueberry juice (Yeah, it's ridiculously expensive, so I used a cheaper 100% juice blueberry-cranberry blend.)
1 teaspoon vanilla extract

Wash and sort the blueberries, making sure to remove any stems or gross squashy berries. Reserve a cup of berries, and puree the rest in a food processor, or mash with a potato masher. Strain puree in a cheesecloth over a colander over the pot you will use to cook the syrup. I like to use my hands to help smoosh the juice out of the cheesecloth.


If you have a juicer, you can skip the pureeing and squishing, and just juice the bluebs, but you will miss out on half the fun and having bits of blueberry in your syrup. I'm not too picky about making sure it's clear, cause I like the bits of fruit - they're tasty. After you have most of the juice out, heat it to boiling with the lemon juice and blueberry juice. Add the sugar and vanilla, stirring to dissolve the sugar, then add the reserved whole blueberries. Bring it back to a boil, and ladle into sterilized pint jars, leaving 1/2 inch of space at the top. Wipe the rims with a clean damp cloth, cap with sterilized, heated lids, and process in a water bath canner for 15 minutes, or 20 minutes if you live at a high altitude like me.

Whole Blueberries (Recipe adapted from pickyourown.com)
7 cups blueberries, washed and sorted
2 cups sugar
4 cups water
2 cups blueberry-cranberry juice
Lemon juice

To make a syrup, bring the water and juice to a boil. Add the sugar, stir to dissolve, and bring back to a boil. Ladle your blueberries into sterilized pint jars and add one tablespoon of lemon juice to every pint. Ladle hot syrup over the berries, leaving 1/2 inch of space at the top. Wipe the rims with a clean damp cloth, cap with sterilized, heated lids, and process in a water bath canner for 15 minutes, or 20 minutes if you live at a high altitude like me.

Beautiful bluebs.

Thursday, May 26, 2011

Harder Cider

“Wow, that is a lot of juice.” An older lady in the store said, ogling my cart. “I'm making cider.” I explained. “How do you do that?” she asked, a perplexed and slightly suspicious look on her face. “Well, basically you just add yeast and possibly sugar and let it ferment for a few weeks and then bottle it!” I exclaimed, happy to be sharing home brewing info with hapless passers by. “Huh.” Obviously she was not convinced. I guess I'm not a very effective evangelist.

And the cider makers.
 So far every cider I've made has been something of an experiment. I'm not big on recipes, and though I have a basic guide to homebrewing, I tend to use a mishmash of advice given to me in person by experienced brewers, knowledge I've gleaned from forums and books I've read on the subject. This cider is a good example of that. I didn't exactly just make it up, but I didn't follow a recipe from a book, either. I'd call this a very basic hard cider, though not quite as basic as my previous super simple cider recipe.

Harder Cider

What you need:
Juice, added Vitamin C is ok, added preservatives are not. Check the label. I used five gallons of unfiltered 100% apple juice.
Yeast, preferably wine or champagne.
Sugar, I used four pounds of turbinado.
Can of apple juice concentrate
Acid blend, available from your FLHBS.
Fermentation vessel, either a plastic bucket with a lid or a large glass jar (carboy) with a stopper.
Air lock
Bottles, 16oz or 750 ml
Siphon hose
Campden tablets, bleach water, or vinegar.
Racking cane, optional

This cider requires a little more work than the previous one, but you can follow all the instructions for making a basic cider from my previous post with a couple added steps. I'm going to assume that you have read the basic instructions for the sake of this post.

After you have sanitized your equipment, pour a gallon of juice into a large pot and heat on medium. Add the sugar and stir until it's dissolved. Add the can of juice concentrate and heat until it's also dissolved. Depending on the size of your pot, you may have to do this in two rounds to dissolve all the sugar. Just make sure your juice/sugar/concentrate mixture is cooled down to body temperature before you add it to the rest of the juice. While it's cooling, add the rest of the juice and five teaspoons of acid blend (or one teaspoon for every gallon of juice) to the fermentation vessel and stir. Add the cooled sugar mixture and the yeast, stir again, and cap.

Sugary, sugary juice.
 I'm going to assume, though my batch isn't finished yet, that this will take more than a week or two to finish fermenting. Let it go until the airlock stops bubbling, or until it bubbles less than once every five minutes. When it doubt, wait before bottling.
According to my handy dandy hydrometer, this concoction has a potential alcohol content of about 11%. By comparison, no sugar added cider (depending on the sugar content of your juice) has an alcohol content of about 6%. The added alcohol has a benefit beyond the obvious, as it allows you to store your cider for much longer without worry that it will go bad. I recommend allowing this cider to age for at least a month or two after bottling. If you try it after a couple months, and you are not impressed, let it sit for a while longer. Try it again at six months. Save a few bottles for a year or two down the road, because it will only get more awesome.

This tart cherry cider  is getting even awesomer in my cupboards RIGHT NOW.

The cost of this cider for me was about $45. The juice was $6 a gallon, four pounds of turbinado sugar was $7, a can of apple juice concentrate was $3.75 and the packet of yeast was $2.50. I already had the acid blend and all the equipment so if you need to acquire those the start up cost would have to be factored in.Compared to commercially produced cider, super cheap! As an added bonus, super delicious! And if you can find a commercial cider with an 11% alcohol content ... let me know.


Monday, May 9, 2011

Compost Failure

I am not a compost expert. I have actually failed at composting. Here's how. When I lived in Seattle, my (awesome) landlords allowed me to garden and compost in the yard, and even surprised me by dropping off a black compost barrel for me to use. It was basically a huge plastic barrel with an open bottom, slits on the side, and a twist off top. I used it, but I moved away before the compost could mature and be used. Sad times.

When I moved to Boulder, I had the amazing idea that I would compost in a big plastic storage bin. Except I didn't drill holes in it to allow for air flow. I kept the lid on. And I didn't add enough brown material. The result was a compost failure of epic-ly smelly proportions. I had started it with the intent of converting it to a worm bin, but I never did, and I couldn't bear to throw my scraps out, so the stench just kept building, until the compost disaster encompassed two bins.

I knew I needed to face my failure. I needed to be brave. I needed a solution. I still wanted worms, but I still didn't feel up to building a worm bin. So I did something radical. I took a step back, and thought of the simplest possible solution.

I dumped my compost. I started with a big pile of leaves, collected from my yard, and dumped the compost on the leaves. I nearly fainted from the smell, but I persevered and interspersed the gooey, rotten compost with layers of leaves, paper, and small wood chips, and covered the whole thing with more leaves. I took a step back, and walked away. I WALKED. AWAY.

Within two days, the pile had reduced in size drastically. I assume it was all that pent up moisture draining into the ground. In another few days the pile was a mere ghost of its former self, and the smell, although not entirely gone, no longer made me want to vomit. Soon, my compost was heating up and decomposing like compost gone wild. SUCCESS. 

Now the compost pile is much loved by birds, squirrels, and bugs. Especially squirrels. They like to remove my layers of leaves that I use to cover food scraps to get to the tasty goodness buried within. And by remove, I mean burrow through and toss to the four winds. I like to bury new food scraps in the pile by digging a little hole to help get them in the middle of all the hot decomposing action. 

I share this story of my miserable, lazy, personal failing with you, to let you know that, even if you fail at a project, you probably haven't ruined it forever. Even if you have, you can try again, and you will probably avoid making the same mistakes. Trying to claim responsibility for your daily needs with something like composting waste is worth doing, even twice. And, if I ever get a worm bin, I'll let you know.

 
Squirrel noms!

Friday, May 6, 2011

Starting Seeds (On The Cheap)

Growing your own food, no matter how little you can manage, is perhaps one of the most empowering DIY projects you can take on. Since I moved to Boulder from Seattle, I've been working on starting a garden from scratch and adapting to the climate in Colorado. Much to my dismay, I wasn't around long enough to harvest very much of my garden in Seattle, except a bit of chard. I am hoping that this time I won't have to move, and the work pays off. I'm dreaming of the first homegrown tomato, which will assuredly never make it out of the garden without being eaten. 


There are many reasons why I aim to grow at least some of my own food, and honestly the primary reason is not to save money. It's about the food, the quality and freshness, the satisfaction of home canned produce all winter long, and not having to throw away packaging, or feel guilty about buying a watermelon grown in an entirely different continent. However, in my pursuit of all these (hopefully) noble goals, I aim to not spend more than I have to. Gardening can get expensive if you let it. I had dreams of a container garden that I could just pick up and take with me when I move, but I had to let it go, because containers are just too expensive. I don't want to turn into this guy.

Sadly, I realized that this $6 container will only give me one or two artichokes.
 
Starting seeds may be the most expensive part of gardening, besides the cost of water. I've read that it's cheaper than buying seedlings, but honestly I think that depends on how you do it. You could buy seed trays, and then larger pots to transfer the seedlings to later, a grow light, or warming pad, and the electricity to run them, seed starting mix, root powder, not to mention potting soil, compost, fertilizer, and, oh yeah, seeds.

Little onions, and some green garlic.

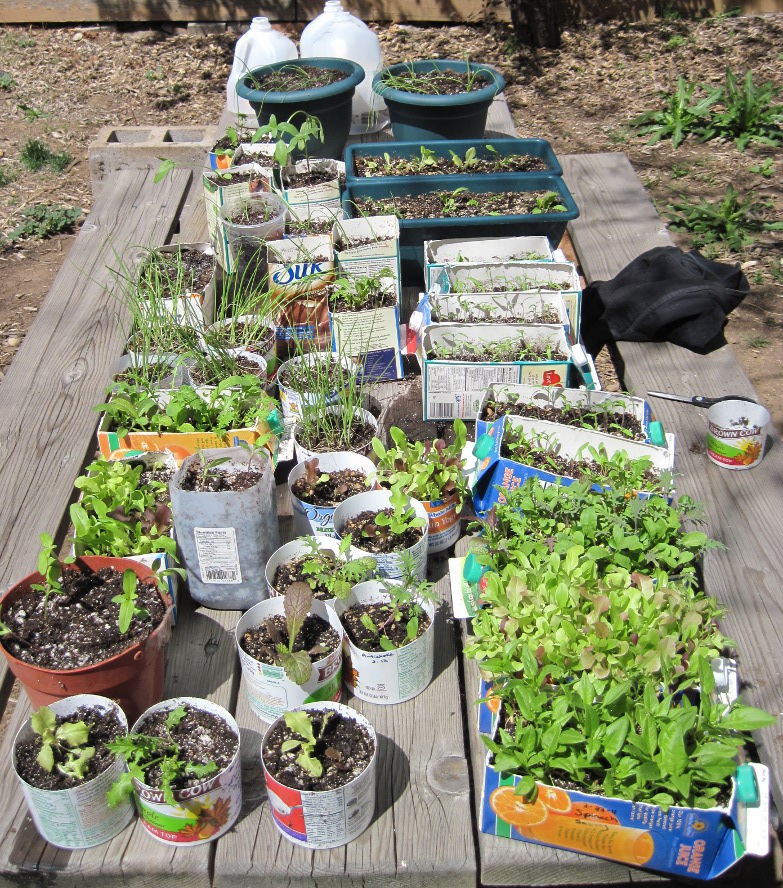
I opt for recycled food containers instead of seed trays and pots. I am lucky to have a nook in the living room with windows on three sides that is perfect for starting seeds. I will admit, I would love to have a greenhouse. I think that is one cost that is totally justified. However, greenhouses are out of reach for me and most folks who live in apartments or generally don't own a house. 

I did buy potting soil, compost, and fertilizer. I started some seeds in seed starting mix, and some in a high quality but less expensive potting soil, and had the same success rate with both. I'd say opt for good potting soil. I have a compost pile of my own decomposing away for future gardening purposes, but it's unfortunately only a few months old and thus not ready for current use. 

Our friendly squirrel neighbor also makes use of our compost.
Most of my “pots” are recycled yogurt tubs and soymilk boxes. Make sure to punch holes for drainage in the bottom of your containers. I also save clear plastic milk jugs for use as mini-greenhouses. So far, I've had a 100% success rate starting seeds with no artificial light or heat except the radiant heat of my apartment, which is generally a little under 60F. I was worried that my tomatoes wouldn't germinate, so I covered them in plastic wrap and they sprouted a couple days later. 

It's not as cute as rows of ceramic pots, but this motley bunch is just as functional.

I bought my seeds from companies that sell heirloom and organic seeds, which means I can save seed from any food I harvest, and use it to plant the next year without having to buy more seeds. Hybrid and GMO seeds do not have this ability. I recommend buying varieties that have been adapted for your climate, or one very similar to yours – another great quality of heirlooms, as many types have been around for hundreds of years. I haven't found them to be significantly more expensive than any other old seed packets, and when you calculate in the benefit of being able to replant from next season's seeds, they are downright cheap. Also, heirloom varieties are just way more awesome than the usual hybrid varieties. Want purple beans, green cauliflower, golden beets, rainbow chard, or black tomatoes? I know I do.


For an interesting look at the cost benefit analysis of a home garden, check out this post by Kitchen Gardeners International.

Monday, May 2, 2011

Yogurt

Confession time. It's hard for me to admit, but ... I ... don't like yogurt. I mean, I use it for a lot of things: in place of sour cream, on spicy food. Generally as a condiment I like yogurt just fine. Frozen yogurt is amazing. But eating a bowl of yogurt by itself? I can't do it. Only total desperation and a lack of food in the house can drive me to such an extreme and masochistic act.

Om nom nom.

My partner, however, loves yogurt. He can eat a tub or two a week, easy. Before I learned to make yogurt we were spending about 3.50 a quart for maple flavored yogurt - two of those a week can add up pretty fast in the grocery budget. Homemade yogurt costs the same as milk, though to start off with you need either a bit of yogurt or a yogurt culture. If you know someone who makes homemade yogurt already I bet you could beg or barter a bit off them for free. I started with a couple spoon fulls of store bought. After you have home made yogurt on hand, you can use that as a started for your next batch. If you can keep up this endless cycle, you will never have to buy yogurt again! As for me, I occasionally forget to reserve some for the next round and end up buying a little cup of yogurt. 

Making yogurt is ridiculously simple. There are a couple tools that make it easier but are not essential, like a thermometer and a heating pad. I don't have a heating pad, so I use the oven with the light on for incubation.

What you need:
Milk - I use whole.
A few spoon fulls of plain yogurt
Quart size mason jar(s)
A large pot, big enough to hold however many jars you are making.
A thermometer (optional)
A jar lifter (optional) - a common canning tool, but you can use a potholder.

A half gallon of milk will make two quarts of yogurt, but of course you can make just one quart, or four, or however many you can fit in your pot. Now is a good time to take your "starter" yogurt out of the fridge.

Fill the jars with milk, put them in the pot, and fill the pot with hot water. Heat on medium until the thermometer in the milk, not the water, reads 180, or, if you are not using a thermometer, until the milk starts gently boiling. The double boiler technique keeps the milk from actually boiling, but allows it to scald which both kills bacteria and denatures some proteins to make the yogurt smooth. If the milk forms a skin, skim it off with a spoon.


 Remove the jars from the water once 180F is reached. Allow the milk to cool back down to 110F - I usually accomplish this by removing the jars from the pot, refilling it with ice water, and putting the jars back in until they drop to110F. If you are not using a thermometer, 110F is the temperature at which you can comfortably dip your finger in for ten seconds, about the same as hot bathwater. Add a spoon full of yogurt to each quart, stir, and cap.


Now you need to make sure your yogurt stays at a constant temperature of 110F, for 7 - 12 hours. You can use a heating pad, or the oven with the light on. I preheat the oven for a minute until the oven thermometer reads 110, and leave the yogurt overnight with the light on. Once I accidentally left it in the oven for a whole day and a half, and I was sure I had ruined it, but the yogurt was super thick and creamy, and still good! Cheese may be milk's leap toward immortality, but yogurt is much easier to make and extends the life of milk by weeks. Not bad. After your yogurt is done incubating, refrigerate it to cool it down. It will continue to thicken in the fridge.

 Microbiotic alchemy!

 Of course, it's not even worth mentioning that store bought yogurt usually contains all sorts of things that aren't milk, right? In case you need more incentive, here's the breakdown.

1 gallon organic milk, not on sale - $5.00
Home made yogurt - $1.25 a quart
1 quart of store bought yogurt, not on sale - $3.50

Thanks, Lactobacillus!
 P.S. The health benefits of yogurt are not to be scoffed at. However I do not recommend trying to get your probiotics from yogurt flavored Pepsi. 

Friday, April 29, 2011

IT'S GOOD FOR YOU!

Sauerkraut and kim chi are both essentially lacto-fermented cabbage. In the case of kim chi, other vegetables, spices, and sometimes even shrimp are added to the cabbage. Having made both kim chi and sauerkraut, I can assure you that they are both super easy to make! If you have never had lacto-fermented vegetables before, they have a pleasantly sour, salty flavor, retain their crunchy texture and - this is the best part - keep forever, or at least a year or so in the fridge.


Or just ferment it!
 Living in the age of refrigeration makes us think that leaving food out for even a couple hours will kill you, but in many cases that is just not true. Lacto-fermentation is extremely safe, even safer than water bath canning, because there is no chance of botulism. The fermentation process allows "good" microorganisms to outcompete those that might make you sick.


 I can think of no better way to preserve an abundance of cabbage for the winter months, and guys, you don't even have to can it! The fermentation process is all you need to do, and that basically amounts to letting it sit out for a few days. You can't go wrong here.


Pink kraut!

Here is what you need to make sauerkraut:
1 cabbage, red or green or half and half!
A quart sized mason jar, or non-metallic crock with a lid
2-4 teaspoons or salt, to taste
Water
A big wooden spoon, or potato masher, or meat hammer, or some other blunt heavy object
Large bowl

For kimchi:
All the equipment listed above
1 napa cabbage
3-4 teaspoons of salt, or more
A bunch of scallions
1 bulb garlic
2 inches ginger
4 or more red chilis
1 daikon radish
4 carrots (optional)
water


Here is what you do. Take the cabbage, peel off the outer leaves and give it a good wash. I have read in some places that you should use only organic cabbage because conventional cabbage will not ferment properly. This is bunk. Use what you have and ignore the crazies.

Cut the cabbage in half (length ways for napa) and then cut out the core. Lay each half on the flat side and slice the cabbage into fairly thin ribbons - maybe half an inch or so. Precision is not critical. For kimchi I like to cut the cabbage into two inch or so chunks. Chop up the other vegetables and spices as well.


Place the shredded cabbage, and for kimchi, the other vegetables and spices, in the large bowl with the salt and pound the bajeezus out of it. The cabbage will start to release its water as a result of being pounded - the salt aids in this as well.

You should be able to see the juice when you tip the bowl..
Pound until it is really juicy, then pack it in the mason jar, or crock, and add enough salt water to cover. Some folks recommend weighing down the cabbage with a (clean) rock to keep it under the water, but personally I haven't had any trouble just capping it as long as you make sure it is submerged in brine. I like to check it every day, and use a spoon to pack it down after taking a sample. If you are using a jar, screw the lid on loosely to allow gas and brine to escape during fermentation. Keep a dish under the jar to catch any liquid that comes out.


Leave the jars out for a few days to a week, until it stops bubbling. You can potentially leave it out at room temperature, but it will continue to ferment and get more sour if you do this. I have eaten kraut that was kept in a basement for five months - this is a preservation technique, after all - but I recommend refrigerating it once it tastes good to you, at least at first, until you get a better idea of how it will taste as it progresses.

That's all there is to it, folks. Kimchi fried rice is a delicious meal for those days when you are out of fresh vegetables and your blood sugar is too low to allow for a trip to the store ... at least, that's been my experience.

My first kimchi ever. I had three quarts, but this is the lone survivor of The Great Pickled Vegetable Consumption of 2011.
If you want to learn more about making sauerkraut or kimchi, I highly recommend Wild Fermentation by Sandor Ellix Katz. It is pretty much The Holy Book of Fermentation.

I leave you on this final note.